REST API to MCP Server with Python: Developer Guide
Introduction to MCP APIs
Picture this: You've spent months building solid REST APIs. Your endpoints work perfectly, your documentation is thorough, and everything runs smoothly. Then suddenly, everyone's talking about AI agents and LLMs, and you're wondering, "How do I make my APIs work with these AI applications without starting over?"
If you're nodding along, you're not alone. This is the exact challenge thousands of developers are facing right now.
Here's the good news: you don't need to throw away your work. The Model Context Protocol (MCP) is like a universal translator that makes your existing REST APIs speak fluent "AI." Think of it as adding a smart adapter to your APIs - they keep doing what they do best, but now AI applications can understand and use them effortlessly.
In this guide, we'll walk through building an MCP server step by step, starting simple and adding features as we go. You'll see exactly how each piece fits together, and by the end, you'll have a working MCP server that wraps your REST API and connects seamlessly with AI clients like Claude Desktop.
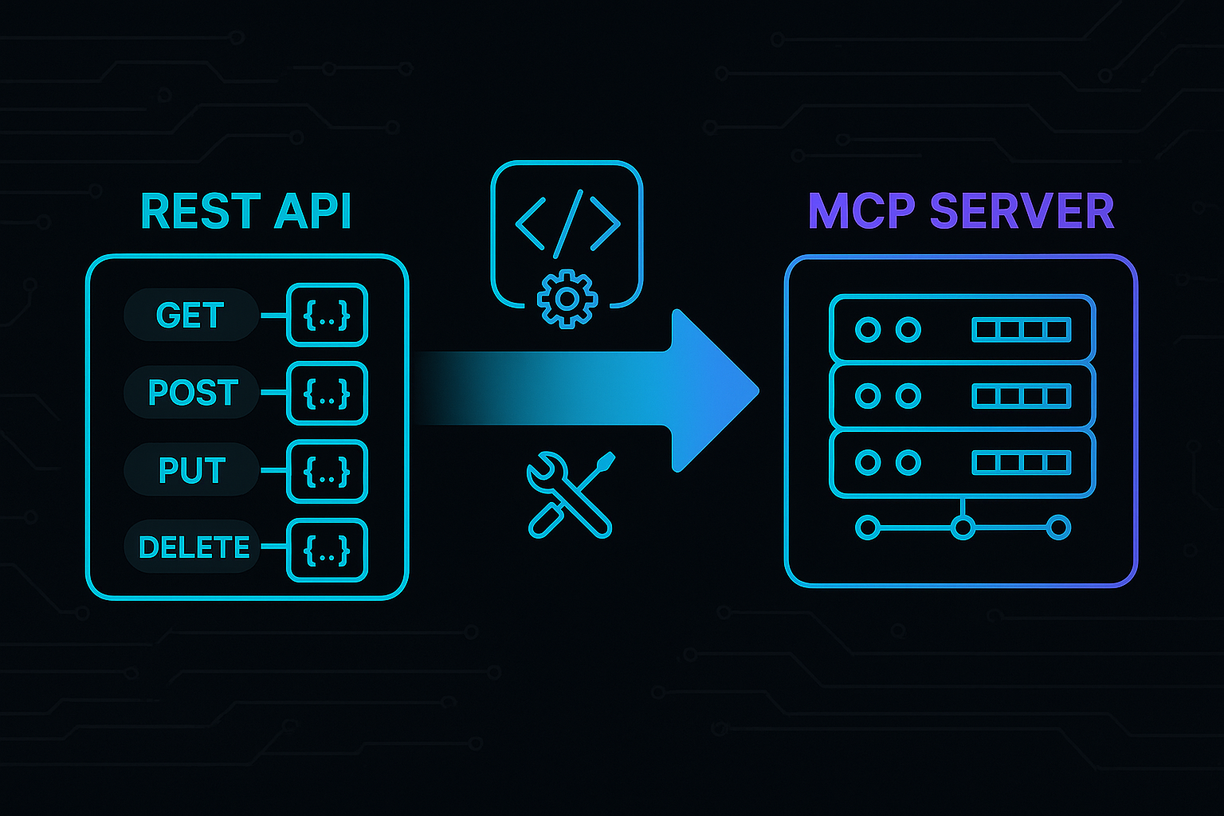
REST APIs vs MCP Servers
Let's start with what you already know. A REST API is a set of HTTP endpoints that accept and return structured data. Each endpoint has a path, method (GET, POST, etc.), and request/response schema. Your clients make HTTP requests and get JSON responses back.
An MCP server is different. Instead of HTTP endpoints, it exposes "tools" and "resources" that AI applications can use. Tools are for actions that change data (like creating a user), while resources provide read-only access to information (like getting user details).
The key insight is this: your REST API becomes the engine, and the MCP server becomes the translator. The MCP server receives requests from AI applications, translates them into REST API calls, and then formats the responses in a way that AI applications can understand.
Here's how the components map:
| REST API Component | MCP Server Equivalent | Purpose |
|---|---|---|
| POST/PUT/DELETE endpoints | Tools | Actions that modify data |
| GET endpoints | Resources | Read-only data access |
| Query parameters | Tool parameters | Input fields for tools |
| Authentication headers | Environment variables | Secure credential handling |
Prerequisites
Before we start building, make sure you have:
- A working REST API with documented endpoints (we'll use a simple user management API as our example)
- Python 3.8+ installed on your system
- Basic knowledge of JSON and API concepts
- An API key or authentication method for your REST API
For our examples, we'll assume you have a REST API with these endpoints:
GET /users/{id}- Get user detailsPOST /users- Create a new userPUT /users/{id}- Update user informationDELETE /users/{id}- Delete a user
Step 1: Setting Up Your Development Environment
Let's start by creating a new project and installing the necessary dependencies.
# Create a new directory for your MCP server
mkdir my-mcp-server
cd my-mcp-server

# Create a virtual environment
python -m venv venv
source venv/bin/activate  # On Windows: venv\Scripts\activate

# Install the MCP SDK and dependencies
pip install mcp httpx python-dotenv
Create a .env file to store your API credentials:
# .env
API_BASE_URL=https://your-api.example.com
API_KEY=your-api-key-here
Step 2: Creating Your First MCP Tool
Let's start with the simplest possible MCP server. We'll create a single tool that fetches user information from your REST API.
Create a file called server.py:
import os
import httpx
from mcp.server.fastmcp import FastMCP

# Load environment variables
API_BASE_URL = os.getenv("API_BASE_URL")
API_KEY = os.getenv("API_KEY")

# Initialize the MCP server
mcp = FastMCP("user-api-server")

@mcp.tool()
async def get_user(user_id: str) -> dict:
    """Get user details by ID from the REST API."""

    # Make the REST API call
    async with httpx.AsyncClient() as client:
        response = await client.get(
            f"{API_BASE_URL}/users/{user_id}",
            headers={"Authorization": f"Bearer {API_KEY}"}
        )

        if response.status_code == 200:
            return response.json()
        else:
            return {"error": f"Failed to get user: {response.status_code}"}

if __name__ == "__main__":
    mcp.run(transport="stdio")
That's it! You've just created your first MCP server. Let's test it:
python server.py
The server will start and wait for input. You can test it using the MCP Inspector (we'll cover that in the testing section).
Step 3: Adding Error Handling and Validation
Our first version works, but it's not very robust. Let's add proper error handling and input validation:
async def make_api_request(method: str, endpoint: str, data: dict = None) -> Dict[str, Any]:
    """Helper function to make REST API requests with proper error handling."""

    headers = {
        "Authorization": f"Bearer {API_KEY}",
        "Content-Type": "application/json"
    }

    async with httpx.AsyncClient(timeout=30.0) as client:
        try:
            if method == "GET":
                response = await client.get(f"{API_BASE_URL}{endpoint}", headers=headers)
            elif method == "POST":
                response = await client.post(f"{API_BASE_URL}{endpoint}", headers=headers, json=data)
            elif method == "PUT":
                response = await client.put(f"{API_BASE_URL}{endpoint}", headers=headers, json=data)
            elif method == "DELETE":
                response = await client.delete(f"{API_BASE_URL}{endpoint}", headers=headers)

            response.raise_for_status()

            # Handle empty responses (common for DELETE operations)
            if response.status_code == 204 or not response.content:
                return {"success": True, "message": "Operation completed successfully"}

            return response.json()

        except httpx.HTTPStatusError as e:
            return {"error": f"HTTP {e.response.status_code}: {e.response.text}"}
        except httpx.TimeoutException:
            return {"error": "Request timeout - API took too long to respond"}
        except Exception as e:
            return {"error": f"Request failed: {str(e)}"}
Now our server handles errors gracefully and validates inputs properly.
Step 4: Adding More Tools
Let's expand our server to handle user creation and updates. We'll add these tools one by one:
@mcp.tool()
async def create_user(name: str, email: str, role: str = "user") -> dict:
    """Create a new user account.

    Args:
        name: User's full name
        email: User's email address
        role: User role (defaults to 'user')
    """

    # Validate inputs
    if not name or not name.strip():
        return {"error": "Name is required"}

    if not email or "@" not in email:
        return {"error": "Valid email is required"}

    user_data = {
        "name": name.strip(),
        "email": email.lower().strip(),
        "role": role
    }

    result = await make_api_request("POST", "/users", data=user_data)

    if "error" in result:
        return {"error": f"Failed to create user: {result['error']}"}

    return {
        "success": True,
        "message": f"User '{name}' created successfully",
        "user": result
    }

@mcp.tool()
async def update_user(user_id: str, name: str = None, email: str = None, role: str = None) -> dict:
    """Update an existing user's information.

    Args:
        user_id: ID of the user to update
        name: New name (optional)
        email: New email (optional)
        role: New role (optional)
    """

    if not user_id or not user_id.strip():
        return {"error": "User ID is required"}

    if not any([name, email, role]):
        return {"error": "At least one field (name, email, or role) must be provided"}

    # Build update data
    update_data = {}
    if name:
        update_data["name"] = name.strip()
    if email:
        if "@" not in email:
            return {"error": "Valid email is required"}
        update_data["email"] = email.lower().strip()
    if role:
        update_data["role"] = role

    result = await make_api_request("PUT", f"/users/{user_id.strip()}", data=update_data)

    if "error" in result:
        return {"error": f"Failed to update user: {result['error']}"}

    return {
        "success": True,
        "message": f"User {user_id} updated successfully",
        "user": result
    }
Step 5: Adding Resources for Read-Only Data
Tools are great for actions, but sometimes AI applications just need to read data. That's where resources come in. Let's add a resource for getting user information:
@mcp.resource("user://{user_id}")
async def get_user_resource(user_id: str) -> str:
    """Get detailed user information as a resource.

    This provides read-only access to user data in a format
    that's easy for AI applications to understand.
    """

    result = await make_api_request("GET", f"/users/{user_id}")

    if "error" in result:
        return f"Error retrieving user {user_id}: {result['error']}"

    user = result

    # Format the data for AI consumption
    formatted_output = f"""
User Profile for ID {user_id}:
- Name: {user.get('name', 'Not specified')}
- Email: {user.get('email', 'Not specified')}
- Role: {user.get('role', 'Not specified')}
- Status: {user.get('status', 'Active')}
- Created: {user.get('created_at', 'Unknown')}
- Last Updated: {user.get('updated_at', 'Unknown')}
"""

    return formatted_output.strip()

@mcp.resource("users://list")
async def list_users_resource() -> str:
    """Get a list of all users in the system."""

    result = await make_api_request("GET", "/users")

    if "error" in result:
        return f"Error retrieving users: {result['error']}"

    users = result.get("users", []) if isinstance(result, dict) else result

    if not users:
        return "No users found in the system."

    # Format the user list for AI consumption
    formatted_output = f"User Directory ({len(users)} users):\n\n"

    for user in users:
        formatted_output += f"• {user.get('name', 'Unknown')} ({user.get('email', 'No email')})\n"
        formatted_output += f"  ID: {user.get('id', 'Unknown')}, Role: {user.get('role', 'Unknown')}\n\n"

    return formatted_output.strip()
Complete Code for the MCP Server
Now that we've built up our MCP server step by step, here's the complete, production-ready code that combines all the pieces we've discussed. You can copy this entire file and run it immediately:
import os
import httpx
from mcp.server.fastmcp import FastMCP
from dotenv import load_dotenv
from typing import Dict, Any, Optional

# Load environment variables from .env file
load_dotenv()

# Load environment variables
API_BASE_URL = os.getenv("API_BASE_URL")
API_KEY = os.getenv("API_KEY")

if not API_BASE_URL or not API_KEY:
    raise ValueError("API_BASE_URL and API_KEY environment variables are required")

# Initialize the MCP server
mcp = FastMCP("user-api-server")

async def make_api_request(method: str, endpoint: str, data: dict = None) -> Dict[str, Any]:
    """Helper function to make REST API requests with proper error handling."""

    headers = {
        "Authorization": f"Bearer {API_KEY}",
        "Content-Type": "application/json"
    }

    async with httpx.AsyncClient(timeout=30.0) as client:
        try:
            if method == "GET":
                response = await client.get(f"{API_BASE_URL}{endpoint}", headers=headers)
            elif method == "POST":
                response = await client.post(f"{API_BASE_URL}{endpoint}", headers=headers, json=data)
            elif method == "PUT":
                response = await client.put(f"{API_BASE_URL}{endpoint}", headers=headers, json=data)
            elif method == "DELETE":
                response = await client.delete(f"{API_BASE_URL}{endpoint}", headers=headers)

            response.raise_for_status()

            # Handle empty responses (common for DELETE operations)
            if response.status_code == 204 or not response.content:
                return {"success": True, "message": "Operation completed successfully"}

            return response.json()

        except httpx.HTTPStatusError as e:
            return {"error": f"HTTP {e.response.status_code}: {e.response.text}"}
        except httpx.TimeoutException:
            return {"error": "Request timeout - API took too long to respond"}
        except Exception as e:
            return {"error": f"Request failed: {str(e)}"}

# TOOLS - for actions that modify data
@mcp.tool()
async def get_user(user_id: str) -> dict:
    """Get user details by ID from the REST API.

    Args:
        user_id: The ID of the user to retrieve
    """

    # Validate input
    if not user_id or not user_id.strip():
        return {"error": "User ID is required"}

    result = await make_api_request("GET", f"/users/{user_id.strip()}")

    if "error" in result:
        return {"error": f"Failed to get user: {result['error']}"}

    return {
        "success": True,
        "user": result
    }

@mcp.tool()
async def create_user(name: str, email: str, role: str = "user") -> dict:
    """Create a new user account.

    Args:
        name: User's full name
        email: User's email address
        role: User role (defaults to 'user')
    """

    # Validate inputs
    if not name or not name.strip():
        return {"error": "Name is required"}

    if not email or "@" not in email:
        return {"error": "Valid email is required"}

    user_data = {
        "name": name.strip(),
        "email": email.lower().strip(),
        "role": role
    }

    result = await make_api_request("POST", "/users", data=user_data)

    if "error" in result:
        return {"error": f"Failed to create user: {result['error']}"}

    return {
        "success": True,
        "message": f"User '{name}' created successfully",
        "user": result
    }

@mcp.tool()
async def update_user(user_id: str, name: Optional[str] = None, email: Optional[str] = None, role: Optional[str] = None) -> dict:
    """Update an existing user's information.

    Args:
        user_id: ID of the user to update
        name: New name (optional)
        email: New email (optional)
        role: New role (optional)
    """

    if not user_id or not user_id.strip():
        return {"error": "User ID is required"}

    if not any([name, email, role]):
        return {"error": "At least one field (name, email, or role) must be provided"}

    # Build update data
    update_data = {}
    if name:
        update_data["name"] = name.strip()
    if email:
        if "@" not in email:
            return {"error": "Valid email is required"}
        update_data["email"] = email.lower().strip()
    if role:
        update_data["role"] = role

    result = await make_api_request("PUT", f"/users/{user_id.strip()}", data=update_data)

    if "error" in result:
        return {"error": f"Failed to update user: {result['error']}"}

    return {
        "success": True,
        "message": f"User {user_id} updated successfully",
        "user": result
    }

@mcp.tool()
async def delete_user(user_id: str) -> dict:
    """Delete a user account.

    Args:
        user_id: ID of the user to delete
    """

    if not user_id or not user_id.strip():
        return {"error": "User ID is required"}

    result = await make_api_request("DELETE", f"/users/{user_id.strip()}")

    if "error" in result:
        return {"error": f"Failed to delete user: {result['error']}"}

    return {
        "success": True,
        "message": f"User {user_id} deleted successfully"
    }

# RESOURCES - for read-only data access optimized for AI consumption
@mcp.resource("user://{user_id}")
async def get_user_resource(user_id: str) -> str:
    """Get detailed user information as a resource.

    This provides read-only access to user data in a format
    that's easy for AI applications to understand.
    """

    result = await make_api_request("GET", f"/users/{user_id}")

    if "error" in result:
        return f"Error retrieving user {user_id}: {result['error']}"

    user = result

    # Format the data for AI consumption
    formatted_output = f"""
User Profile for ID {user_id}:
- Name: {user.get('name', 'Not specified')}
- Email: {user.get('email', 'Not specified')}
- Role: {user.get('role', 'Not specified')}
- Status: {user.get('status', 'Active')}
- Created: {user.get('created_at', 'Unknown')}
- Last Updated: {user.get('updated_at', 'Unknown')}
"""

    return formatted_output.strip()

@mcp.resource("users://list")
async def list_users_resource() -> str:
    """Get a list of all users in the system."""

    result = await make_api_request("GET", "/users")

    if "error" in result:
        return f"Error retrieving users: {result['error']}"

    users = result.get("users", []) if isinstance(result, dict) else result

    if not users:
        return "No users found in the system."

    # Format the user list for AI consumption
    formatted_output = f"User Directory ({len(users)} users):\n\n"

    for user in users:
        formatted_output += f"• {user.get('name', 'Unknown')} ({user.get('email', 'No email')})\n"
        formatted_output += f"  ID: {user.get('id', 'Unknown')}, Role: {user.get('role', 'Unknown')}\n\n"

    return formatted_output.strip()

if __name__ == "__main__":
    mcp.run(transport="stdio")
Save this as server.py, make sure your .env file is configured with your API credentials, and run:
python server.py
Step 6: Testing Your MCP Server
Before connecting to AI clients, let's test our server using the MCP Inspector. First, install it:
npm install -g @modelcontextprotocol/inspector
Then test your server:
mcp-inspector python server.py
This opens a web interface where you can:
- See all your tools and resources
- Test each tool with different inputs
- View the responses
- Debug any issues
Try calling the get_user tool with a user ID, or the create_user tool with name and email parameters. You should see the actual REST API calls being made and the responses formatted for AI consumption.
Step 7: Connecting to Claude Desktop
Now for the exciting part - connecting your MCP server to Claude Desktop so you can actually use it with an AI application.
Installing Claude Desktop
First, download and install Claude Desktop if you haven't already.
Configuring Your MCP Server
Claude Desktop looks for MCP server configurations in a specific file. The location depends on your operating system:
On macOS:
~/Library/Application Support/Claude/claude_desktop_config.json
On Windows:
%APPDATA%\Claude\claude_desktop_config.json
On Linux:
~/.config/Claude/claude_desktop_config.json
Create this file if it doesn't exist, and add your MCP server configuration:
{
  "mcpServers": {
    "user-api-server": {
      "command": "python",
      "args": ["/path/to/your/server.py"],
      "env": {
        "API_BASE_URL": "https://your-api.example.com",
        "API_KEY": "your-api-key-here"
      }
    }
  }
}
Important notes:
- Replace
/path/to/your/server.pywith the actual absolute path to your server file - Replace the environment variables with your actual API URL and key
- Make sure Python is in your system PATH, or use the full path to your Python executable
Testing the Connection
- Restart Claude Desktop after saving the configuration file
- Open a new conversation in Claude Desktop
- Look for the MCP indicator - you should see a small tool icon or indicator showing that your MCP server is connected
- Test your tools by asking Claude to interact with your API:
Try these example prompts:
- "Can you get information about user ID 123?"
- "Create a new user named John Doe with email john@example.com"
- "Update user 456 to change their role to admin"
Claude should now be able to call your MCP tools and work with your REST API data!
Troubleshooting Connection Issues
If Claude Desktop doesn't connect to your server:
- Check the logs - Claude Desktop usually shows connection errors in its developer console
- Verify file paths - Make sure all paths in the config are absolute and correct
- Test your server independently - Run
python server.pydirectly to ensure it starts without errors - Check environment variables - Ensure your API credentials are correctly set
- Restart Claude Desktop - Configuration changes require a restart
Step 8: Advanced Features and Best Practices
Adding Authentication Handling
For production use, you'll want more sophisticated authentication handling:
import os
from datetime import datetime, timedelta

class APIAuthenticator:
    def __init__(self):
        self.api_key = os.getenv("API_KEY")
        self.token = None
        self.token_expires = None

    async def get_headers(self):
        """Get authentication headers, refreshing token if needed."""

        # For simple API key auth
        if self.api_key:
            return {"Authorization": f"Bearer {self.api_key}"}

        # For OAuth or token-based auth (implement token refresh logic here)
        if self.token and self.token_expires > datetime.now():
            return {"Authorization": f"Bearer {self.token}"}

        # Refresh token logic would go here
        await self.refresh_token()
        return {"Authorization": f"Bearer {self.token}"}

    async def refresh_token(self):
        """Implement your token refresh logic here."""
        pass

# Use the authenticator in your API requests
auth = APIAuthenticator()

async def make_authenticated_request(method: str, endpoint: str, data: dict = None):
    headers = await auth.get_headers()
    headers["Content-Type"] = "application/json"

    # Rest of your request logic...
Adding Logging and Monitoring
Add comprehensive logging to help with debugging and monitoring:
import logging

# Configure logging
logging.basicConfig(
    level=logging.INFO,
    format='%(asctime)s - %(name)s - %(levelname)s - %(message)s'
)
logger = logging.getLogger(__name__)

async def make_api_request(method: str, endpoint: str, data: dict = None) -> Dict[str, Any]:
    """Enhanced API request function with logging."""

    logger.info(f"Making {method} request to {endpoint}")

    try:
        # Your existing request logic...

        logger.info(f"Request successful: {method} {endpoint}")
        return response.json()

    except Exception as e:
        logger.error(f"Request failed: {method} {endpoint} - {str(e)}")
        return {"error": f"Request failed: {str(e)}"}
Handling Rate Limits
Add intelligent rate limiting and retry logic:
import asyncio
from typing import Optional

class RateLimitHandler:
    def __init__(self, max_retries: int = 3, base_delay: float = 1.0):
        self.max_retries = max_retries
        self.base_delay = base_delay

    async def make_request_with_retry(self, request_func, *args, **kwargs):
        """Make a request with exponential backoff retry logic."""

        for attempt in range(self.max_retries + 1):
            try:
                response = await request_func(*args, **kwargs)

                # Check for rate limiting
                if hasattr(response, 'status_code') and response.status_code == 429:
                    if attempt < self.max_retries:
                        delay = self.base_delay * (2 ** attempt)
                        logger.warning(f"Rate limited, retrying in {delay} seconds...")
                        await asyncio.sleep(delay)
                        continue

                return response

            except Exception as e:
                if attempt < self.max_retries:
                    delay = self.base_delay * (2 ** attempt)
                    logger.warning(f"Request failed, retrying in {delay} seconds: {str(e)}")
                    await asyncio.sleep(delay)
                    continue
                raise e

        raise Exception("Max retries exceeded")
Production-Ready Complete Code: All Advanced Features Included
Here's the complete, production-ready MCP server that integrates all the advanced features from Step 8. This version includes authentication handling, comprehensive logging, and intelligent rate limiting:
import os
import httpx
import asyncio
import logging
from mcp.server.fastmcp import FastMCP
from dotenv import load_dotenv
from typing import Dict, Any, Optional
from datetime import datetime, timedelta

# Configure logging
logging.basicConfig(
    level=logging.INFO,
    format='%(asctime)s - %(name)s - %(levelname)s - %(message)s'
)
logger = logging.getLogger(__name__)

# Load environment variables from .env file
load_dotenv()

# Load environment variables
API_BASE_URL = os.getenv("API_BASE_URL")
API_KEY = os.getenv("API_KEY")

if not API_BASE_URL or not API_KEY:
    raise ValueError("API_BASE_URL and API_KEY environment variables are required")

# Initialize the MCP server
mcp = FastMCP("user-api-server")

class APIAuthenticator:
    """Handle API authentication with token refresh capabilities."""

    def __init__(self):
        self.api_key = os.getenv("API_KEY")
        self.token = None
        self.token_expires = None

    async def get_headers(self):
        """Get authentication headers, refreshing token if needed."""

        # For simple API key auth
        if self.api_key:
            return {"Authorization": f"Bearer {self.api_key}"}

        # For OAuth or token-based auth (implement token refresh logic here)
        if self.token and self.token_expires > datetime.now():
            return {"Authorization": f"Bearer {self.token}"}

        # Refresh token logic would go here
        await self.refresh_token()
        return {"Authorization": f"Bearer {self.token}"}

    async def refresh_token(self):
        """Implement your token refresh logic here."""
        # This is where you'd implement OAuth token refresh
        # For now, we'll just use the API key
        pass

class RateLimitHandler:
    """Handle rate limiting with exponential backoff retry logic."""

    def __init__(self, max_retries: int = 3, base_delay: float = 1.0):
        self.max_retries = max_retries
        self.base_delay = base_delay

    async def make_request_with_retry(self, request_func, *args, **kwargs):
        """Make a request with exponential backoff retry logic."""

        for attempt in range(self.max_retries + 1):
            try:
                response = await request_func(*args, **kwargs)

                # Check for rate limiting
                if hasattr(response, 'status_code') and response.status_code == 429:
                    if attempt < self.max_retries:
                        delay = self.base_delay * (2 ** attempt)
                        logger.warning(f"Rate limited, retrying in {delay} seconds...")
                        await asyncio.sleep(delay)
                        continue

                return response

            except Exception as e:
                if attempt < self.max_retries:
                    delay = self.base_delay * (2 ** attempt)
                    logger.warning(f"Request failed, retrying in {delay} seconds: {str(e)}")
                    await asyncio.sleep(delay)
                    continue
                raise e

        raise Exception("Max retries exceeded")

# Initialize authentication and rate limiting
auth = APIAuthenticator()
rate_limiter = RateLimitHandler()

async def make_api_request(method: str, endpoint: str, data: dict = None) -> Dict[str, Any]:
    """Enhanced API request function with authentication, logging, and rate limiting."""

    logger.info(f"Making {method} request to {API_BASE_URL}{endpoint}")

    async def _make_request():
        headers = await auth.get_headers()
        headers["Content-Type"] = "application/json"

        async with httpx.AsyncClient(timeout=30.0) as client:
            if method == "GET":
                return await client.get(f"{API_BASE_URL}{endpoint}", headers=headers)
            elif method == "POST":
                return await client.post(f"{API_BASE_URL}{endpoint}", headers=headers, json=data)
            elif method == "PUT":
                return await client.put(f"{API_BASE_URL}{endpoint}", headers=headers, json=data)
            elif method == "DELETE":
                return await client.delete(f"{API_BASE_URL}{endpoint}", headers=headers)

    try:
        response = await rate_limiter.make_request_with_retry(_make_request)
        response.raise_for_status()

        # Handle empty responses (common for DELETE operations)
        if response.status_code == 204 or not response.content:
            logger.info(f"Request successful: {method} {endpoint}")
            return {"success": True, "message": "Operation completed successfully"}

        logger.info(f"Request successful: {method} {endpoint}")
        return response.json()

    except httpx.HTTPStatusError as e:
        logger.error(f"HTTP error: {e.response.status_code} for {method} {endpoint}")
        return {"error": f"HTTP {e.response.status_code}: {e.response.text}"}
    except httpx.TimeoutException:
        logger.error(f"Timeout error for {method} {endpoint}")
        return {"error": "Request timeout - API took too long to respond"}
    except Exception as e:
        logger.error(f"Unexpected error for {method} {endpoint}: {str(e)}")
        return {"error": f"Request failed: {str(e)}"}

# TOOLS - for actions that modify data
@mcp.tool()
async def get_user(user_id: str) -> dict:
    """Get user details by ID from the REST API.

    Args:
        user_id: The ID of the user to retrieve
    """

    # Validate input
    if not user_id or not user_id.strip():
        return {"error": "User ID is required"}

    result = await make_api_request("GET", f"/users/{user_id.strip()}")

    if "error" in result:
        return {"error": f"Failed to get user: {result['error']}"}

    return {
        "success": True,
        "user": result
    }

@mcp.tool()
async def create_user(name: str, email: str, role: str = "user") -> dict:
    """Create a new user account.

    Args:
        name: User's full name
        email: User's email address
        role: User role (defaults to 'user')
    """

    # Validate inputs
    if not name or not name.strip():
        return {"error": "Name is required"}

    if not email or "@" not in email:
        return {"error": "Valid email is required"}

    user_data = {
        "name": name.strip(),
        "email": email.lower().strip(),
        "role": role
    }

    result = await make_api_request("POST", "/users", data=user_data)

    if "error" in result:
        return {"error": f"Failed to create user: {result['error']}"}

    return {
        "success": True,
        "message": f"User '{name}' created successfully",
        "user": result
    }

@mcp.tool()
async def update_user(user_id: str, name: Optional[str] = None, email: Optional[str] = None, role: Optional[str] = None) -> dict:
    """Update an existing user's information.

    Args:
        user_id: ID of the user to update
        name: New name (optional)
        email: New email (optional)
        role: New role (optional)
    """

    if not user_id or not user_id.strip():
        return {"error": "User ID is required"}

    if not any([name, email, role]):
        return {"error": "At least one field (name, email, or role) must be provided"}

    # Build update data
    update_data = {}
    if name:
        update_data["name"] = name.strip()
    if email:
        if "@" not in email:
            return {"error": "Valid email is required"}
        update_data["email"] = email.lower().strip()
    if role:
        update_data["role"] = role

    result = await make_api_request("PUT", f"/users/{user_id.strip()}", data=update_data)

    if "error" in result:
        return {"error": f"Failed to update user: {result['error']}"}

    return {
        "success": True,
        "message": f"User {user_id} updated successfully",
        "user": result
    }

@mcp.tool()
async def delete_user(user_id: str) -> dict:
    """Delete a user account.

    Args:
        user_id: ID of the user to delete
    """

    if not user_id or not user_id.strip():
        return {"error": "User ID is required"}

    result = await make_api_request("DELETE", f"/users/{user_id.strip()}")

    if "error" in result:
        return {"error": f"Failed to delete user: {result['error']}"}

    return {
        "success": True,
        "message": f"User {user_id} deleted successfully"
    }

# RESOURCES - for read-only data access optimized for AI consumption
@mcp.resource("user://{user_id}")
async def get_user_resource(user_id: str) -> str:
    """Get detailed user information as a resource.

    This provides read-only access to user data in a format
    that's easy for AI applications to understand.
    """

    result = await make_api_request("GET", f"/users/{user_id}")

    if "error" in result:
        return f"Error retrieving user {user_id}: {result['error']}"

    user = result

    # Format the data for AI consumption
    formatted_output = f"""
User Profile for ID {user_id}:
- Name: {user.get('name', 'Not specified')}
- Email: {user.get('email', 'Not specified')}
- Role: {user.get('role', 'Not specified')}
- Status: {user.get('status', 'Active')}
- Created: {user.get('created_at', 'Unknown')}
- Last Updated: {user.get('updated_at', 'Unknown')}
"""

    return formatted_output.strip()

@mcp.resource("users://list")
async def list_users_resource() -> str:
    """Get a list of all users in the system."""

    result = await make_api_request("GET", "/users")

    if "error" in result:
        return f"Error retrieving users: {result['error']}"

    users = result.get("users", []) if isinstance(result, dict) else result

    if not users:
        return "No users found in the system."

    # Format the user list for AI consumption
    formatted_output = f"User Directory ({len(users)} users):\n\n"

    for user in users:
        formatted_output += f"• {user.get('name', 'Unknown')} ({user.get('email', 'No email')})\n"
        formatted_output += f"  ID: {user.get('id', 'Unknown')}, Role: {user.get('role', 'Unknown')}\n\n"

    return formatted_output.strip()

if __name__ == "__main__":
    logger.info("Starting production-ready MCP server with advanced features...")
    mcp.run(transport="stdio")
Save this as server_production.py and run it with:
python server_production.py
Common Pitfalls and How to Avoid Them
Schema Mismatch Issues
Problem: Your MCP tool schemas don't match what your REST API expects.
Solution: Always test your schemas against real API calls. Use tools like Postman to verify your API behavior first, then ensure your MCP schemas match exactly.
Authentication Complexity
Problem: OAuth flows and token refresh can get complex in long-running MCP servers.
Solution: Build modular authentication that handles token refresh automatically. Test your authentication logic separately from your MCP tools.
Performance Assumptions
Problem: AI applications can generate very different traffic patterns than traditional clients.
Solution: Implement proper rate limiting, connection pooling, and monitoring. Test with realistic AI usage patterns.
Error Message Quality
Problem: Technical error messages from your REST API aren't helpful for AI applications or end users.
Solution: Transform technical errors into human-friendly explanations that AI applications can use to help users understand and fix problems.
Conclusions
You've just built a complete MCP server that bridges your REST API with AI applications. You started with a simple tool, added error handling, expanded functionality, and connected it to Claude Desktop. Your APIs are now AI-ready!
The step-by-step approach we've used here - starting simple and building up functionality - is the key to successful MCP server development. You can apply these same patterns to any REST API, whether it's a simple CRUD interface or a complex enterprise system.
Remember the key principles:
- Start simple with one tool and build up gradually
- Handle errors gracefully and provide meaningful feedback
- Test thoroughly using the MCP Inspector before connecting to AI clients
- Think from the AI's perspective when designing tool interfaces
Your REST API, enhanced with MCP capabilities, isn't just a data source anymore - it's an active participant in AI-powered workflows. The bridge you've built between traditional APIs and AI applications opens up possibilities we're only beginning to explore.
References
[1] Anthropic. "Introducing the Model Context Protocol." https://www.anthropic.com/news/model-context-protocol
[2] Model Context Protocol Official Documentation. https://modelcontextprotocol.io/
[3] Model Context Protocol Python SDK. https://modelcontextprotocol.io/quickstart/server
[4] Claude Desktop Download. https://claude.ai/download